Building a website might seem like a daunting task, especially if you’re new to the process. But with WordPress, creating a professional-looking website is easier than you think. Whether you’re starting a blog, showcasing your portfolio, or launching a business, WordPress offers all the tools you need to bring your vision to life—no coding required.
From choosing a domain name to hitting the “publish” button, this guide will walk you through every step to get your site up and running quickly and stress-free.
Let’s dive in!
6 Easy Steps to Make a WordPress Website
Creating a website may seem overwhelming, but with the right platform and guidance, it’s a straightforward process. This step-by-step tutorial will guide you through the entire journey.
One of the most crucial decisions you’ll make is selecting the right platform for your website. Many beginners fall into the trap of choosing limited or overly complex website builders. To avoid this mistake, we recommend WordPress.org as the best website builder and platform over WordPress.com and other platforms.
Do you wonder why WordPress.org is best over WordPress.com? See our guide – WordPress.com vs WordPress.org: Which is Better? to understand the difference between both.
A self-hosted WordPress.org site gives you complete control, unmatched flexibility, and access to thousands of themes and plugins that allow you to create any type of website you can imagine.
Unlike other platforms and various website builders, WordPress.org is free to use without restrictions. While the platform itself is free, you’ll need to purchase web hosting.
The good news is that many hosting providers, like Liquid Web, Bluehost, Hostinger offers a 1-click WordPress installer to make the setup process effortless. This combination of hosting and WordPress gives you the freedom to build a professional website with ease.
So, let’s explore the six simple steps to create your WordPress site.
Step 1: Find and Register a Domain Name
Your domain name is like your online home address—it’s how people find and remember your website. Learning how to choose and buy a domain name is the first step in building your WordPress site. Start by brainstorming names that reflect your brand or niche. Keep it catchy, simple, and easy to spell.
If your first choice is taken, don’t stress! You can tweak the wording or try creative variations. For instance, if “DailyNews.com” isn’t available, you could go with “TheDailyBuzz.net” or “YourNewsWorld.org.”
Once you have some ideas, use platforms like Namecheap or GoDaddy to check availability. Aim for extensions like “.com,” “.net,” or “.org” since they’re widely recognized and trusted.
Got the perfect name? Great! Now, register it as soon as possible.
Step 2: Choose the Best Web Hosting
Choosing the right web hosting is like finding the most suitable house for your site. It’s where all your site’s files and data will live, so reliability and ease of use are key. For beginners, a webhost like Hostinger is an excellent choice.
Not only does it integrate seamlessly with WordPress, but it also offers a one-click WordPress installation, making the setup process a breeze.
And, Liquid Web is a great choice, if you’re looking for speialised Managed WordPress hosting services.
When picking a wordpress hosting plan, think about your needs.
- Are you creating a single website or multiple?
- Do you need a lot of storage for media-heavy content, or is basic functionality enough?
- For most small websites, shared hosting is an affordable and efficient option. It’s budget-friendly and comes with built-in maintenance and security features.
- If you need more control, options like VPS or dedicated hosting offer greater flexibility. If you choose Bluehost, you’ll find a plan tailored to your needs.
Step 3: Install WordPress
Getting WordPress up and running is simpler than you might think. Most hosting providers, like Liquid Web, make the process quick and beginner-friendly with just a few clicks. Instead of dealing with complex manual installations, you can use your hosting account to install WordPress effortlessly and start building your site.
Here’s how to install WordPress through your hosting account:
- Log into your hosting account’s control panel (commonly known as cPanel)
- Look for the “Install WordPress” or “WordPress Installer” option
- Select it and enter your site details, like your chosen domain name
- Click “Install,” and let system handle the rest
- Once installed, access your WordPress dashboard to start customizing your website
In minutes, you’ll be ready to explore WordPress caching plugins like WP Rocket, themes, and content creation tools.
Step 4: Setup Your Site
Now that WordPress is installed, it’s time to bring your website to life by setting it up exactly how you want it.
Choose a Website Theme
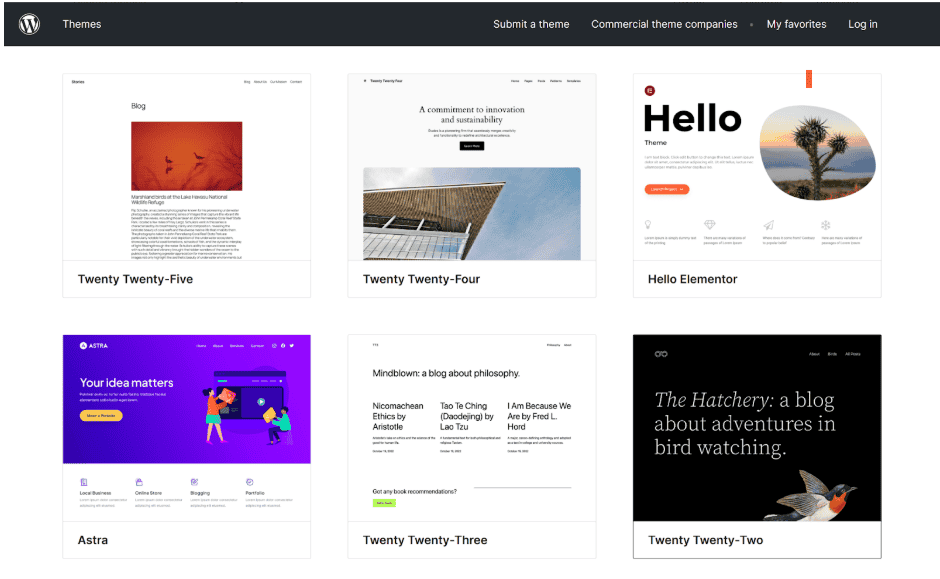
Choosing the right WordPress theme is an essential step in creating a website that matches your style and purpose. A theme defines your site’s overall look, including colors, fonts, layouts, and more.
While WordPress comes with a basic default theme, it may not be the best fit for your goals. Luckily, there are thousands of free and premium themes available, offering endless customization options.

To find and install a theme:

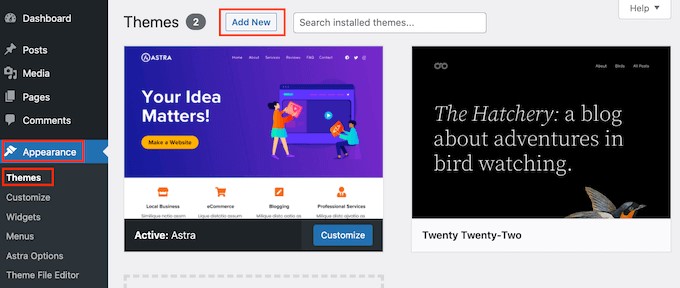
- Go to your WordPress admin dashboard and click on Appearance > Themes
- Click the ‘Add New’ button to access the WordPress theme directory
- Explore over 11,000 free themes and sort them by popular, latest, or features like industry type and layout
- Preview the best WordPress themes to see how they’ll look on your site
- Once you’ve chosen a theme, click ‘Install’ and then ‘Activate’
- With the right theme, you’ll set the foundation for a visually appealing and user-friendly website.
Top WordPress Themes to Consider:
- Astra: A lightweight and highly customizable theme perfect for blogs, portfolios, and eCommerce sites. It’s fast, SEO-friendly, and works seamlessly with popular page builders.
- Elegant Themes: Known for their flagship theme, Divi, Elegant Themes offers stunning design options and a powerful drag-and-drop builder for complete creative control.
- Solid WP: A robust and reliable theme ideal for business and professional websites, offering excellent performance, built-in SEO features, and flexible customization options..
Add Pages to Your Website
After picking the perfect theme, it’s time to add pages to your WordPress site. These pages will act as the core structure of your website, providing visitors with the information they need.
Take a Look at WordPress Page Builders
Think of them as the different rooms in your virtual home—each with a purpose. At a minimum, your site should include a few key pages to guide your audience effectively.
Must-Have Pages to Start With:
Home: The first page visitors see when they land on your site. It should make a great first impression with a clear message and easy navigation.
About: Share your story, mission, and values. This page helps visitors understand who you are and why they should trust your brand.
Products/Services: Showcase what you offer in detail. Highlight features, benefits, and why your offerings stand out.
Contact: Make it easy for people to reach out to you with a contact form, email, or phone number.
How to Add Pages in WordPress:
Start by creating your essential pages. Navigate to Pages > Add New in your WordPress admin area. You’ll find an editor where you can:
- Add a title for your page (e.g., “About Us”).
- Insert content like text, images, links, or videos in the editor below.
- Once you’re happy, click Publish to make the page live.
- Repeat this process to create all your necessary pages, such as your homepage, contact page, or a custom blog page.
As you create these pages, think about how they’ll fit into your site’s navigation. A clean, well-organized menu ensures visitors can find what they’re looking for without frustration. Adding pages and structuring your site thoughtfully is key to a great user experience.
Customize Pages
Once your pages are set up, it’s time to customize them to match your brand’s style and purpose. Customizing your pages ensures your website looks polished, professional, and consistent. A consistent design helps visitors feel at ease while navigating your site—nobody likes a website that feels messy or disorganized.
To maintain a cohesive look, consider creating a style guide. This guide will define your website’s visual identity and make sure all your pages follow the same design rules. Here are a few key elements you should focus:
- Color scheme: Stick to your brand colors to keep the design consistent.
- Font style and color: Choose fonts that are readable and align with your brand personality.
- Image style: Decide on a uniform image format or editing style to create visual harmony.
- Element placements: Ensure buttons, forms, and key elements are in consistent locations across pages.
- Page formatting: Use a similar layout for pages like product listings, blogs, or services.
Taking time to create a clear and consistent design across your pages will give your site a professional edge and make it easier for visitors to engage with your content.
Install the Plugins You Need
Plugins are the secret to unlocking the full potential of your WordPress website. They let you add powerful features and functionality without writing a single line of code. Whether you want to improve your site’s SEO, add contact forms, or enhance security, plugins can help you achieve it all.
WordPress offers over 58,000 free and premium plugins to cater to every need. Here’s a closer look at some of the best free website plugins and their uses.
Best Free Plugins and Their Uses
- Yoast SEO: One of the best SEO plugins for WordPress, Yoast helps optimize your content for search engines. It provides suggestions to improve readability, keyword usage, and metadata, making it easier for your site to rank higher on Google.
- WPForms: This is a user-friendly WordPress plugin that allows you to create custom contact forms. It comes with pre-built templates and a drag-and-drop editor, ensuring visitors can reach you effortlessly through professional-looking forms.
- UpdraftPlus: One of the best WordPress backup and restore plugins, UpdraftPlus ensures your site’s data is secure. It enables automatic backups, making it easy to restore your site in case of data loss or technical issues.
Other Must-Have WordPress Plugins
While free plugins are an excellent starting point, premium plugins offer advanced features for growing websites. For example:
- Wordfence Security: As one of the best WordPress security plugins, Wordfence provides robust protection against malware and unauthorized access. It’s perfect for keeping your site secure.
- WooCommerce: If you’re running an eCommerce site, WooCommerce is the go-to plugin for setting up an online store. It offers features for product management, payment integration, and more.
- MonsterInsights: This plugin integrates Google Analytics directly into your WordPress dashboard, giving you insights into your site’s performance and helping you make data-driven decisions.
When installing plugins, always check compatibility to ensure they work well together. Avoid overloading your site with unnecessary plugins, as it can slow down performance.
Start with essential tools like an SEO plugin, a backup solution, and a reliable security plugin, and expand as your website grows.
How to Install a WordPress Plugin?
Here’s a quick guide to installing a WordPress plugin:
- On the left-hand menu, hover over Plugins and select Add New.
- Explore the available plugins using the Featured, Popular, and Recommended tabs to find what you need.
- Once you find a plugin, click Install Now to begin the process.
- After installation, click Activate to enable the plugin on your site.
Most plugins have configuration options accessible via the “Plugins” or “Settings” menu. Use these to fine-tune the plugin’s features.
Step 5: Create Helpful Content
Creating helpful content is the heart of building a successful WordPress website. WordPress makes it easy to organize your site with two primary content types: posts and pages. Pages are typically static, one-time content like your “About Us” or “Contact” pages, while posts are dynamic and perfect for blog updates or news sections.
Add Content to Your Website
To create blog content, head over to Posts > Add New in the admin area. The editor works similarly to the one for pages but includes additional features like categories and tags to organize your posts. Here’s how you can add a post:
- Enter a post title that grabs attention.
- Add your content in the editor, including text, images, and embeds.
- Use the options in the sidebar to select categories and tags for better organization.
- Click Save Draft to save your work or Publish to make it live.
With these tools, you can structure your website content and keep it fresh and engaging for your visitors. Your pages will serve as the backbone of your site, while your posts will keep your audience coming back for more updates.
Step 6: Publish Your Website
Once you’re happy with your content and website setup, it’s time to hit that publish button and share your creation with the world. WordPress makes publishing your site flexible and easy. You can choose to make your content live instantly or schedule it to go live at a specific date and time.
Scheduling can be especially useful if you’re planning a campaign launch, rolling out blog posts, or managing product releases for an eCommerce site. Just set the date and time, and WordPress will handle the rest.
Additionally, explore tips on how to secure a WordPress website to protect your data and visitors.
When you’re ready to publish:
- Review your content to ensure everything looks perfect.
- Navigate to the Publish options in the WordPress editor.
- Choose Publish Immediately to go live or set a specific schedule.
- Hit Publish and celebrate—you’ve officially launched your website!
Now, focus on optimizing your site further. To do that, understand how to speed up your WordPress site for a better user experience.
Congratulations! Your WordPress site is now live and ready to make an impact.
Final Thoughts
In this blog, we explored How to Create a WordPress Website, offering a step-by-step guide for small business owners, bloggers, eCommerce store owners, and webmasters. With WordPress, the possibilities are endless—you can customize, expand, and create a site that truly reflects your vision.
Now that you’re equipped with the tools and guidance, it’s time to take the first step. Start building your website today and bring your ideas to life. Remember, every great website begins with a single click, so dive in and enjoy the journey of creating something amazing.
FAQs
Can I create a WordPress website for free?
Yes, you can create a WordPress website for free using the WordPress.com Free plan. It includes hosting, a subdomain, and access to beautiful design options. If you need more advanced features, you can upgrade to a paid plan anytime as your website grows.
Does WordPress require coding?
No, WordPress doesn’t require coding. It’s designed to help users create and manage websites easily with themes, templates, and plugins. However, if you know coding, you can customize your site even further.
Which is better, HTML or WordPress?
It depends on your needs and technical skills. HTML is great for static websites if you’re comfortable with coding. On the other hand, WordPress is more user-friendly and perfect for dynamic websites, offering themes, plugins, and easy customization without coding knowledge. For most people, WordPress is the better choice.
Can I code my own website on WordPress?
Yes, you can code your own website on WordPress. Using the built-in text editor, you can add or edit HTML, CSS, or PHP to customize your site. The only limit is your coding knowledge, so feel free to make changes and save them as needed.
Is WordPress SEO-friendly?
Yes, WordPress is highly SEO-friendly. It’s designed to help you structure and manage your content in ways that search engines love. With built-in features and SEO plugins like Yoast, it’s one of the best CMS options for boosting your site’s visibility.
 Get Listed


